For arlanix/product-feed 1.0
Your first feed
This page makes one feed from start to finish: a Google Shopping feed written as a CSV file on your store, which Google Merchant Center then collects every day. It takes about ten minutes. Every screen is shown as it looks in the admin, so you can compare as you go. The screenshots were taken in Magento's sample store, which sells clothes and bags; your products and categories will be your own.
The same steps make a feed for Meta, TikTok or any other platform. Only the Type differs, and the platforms page says what changes.
Before you start, the module must be installed and you need a Google Merchant Center account: Before you start has both.
Step 1. Open the feed grid
Go to Arlanix → Feeds. On a fresh installation the grid is empty.
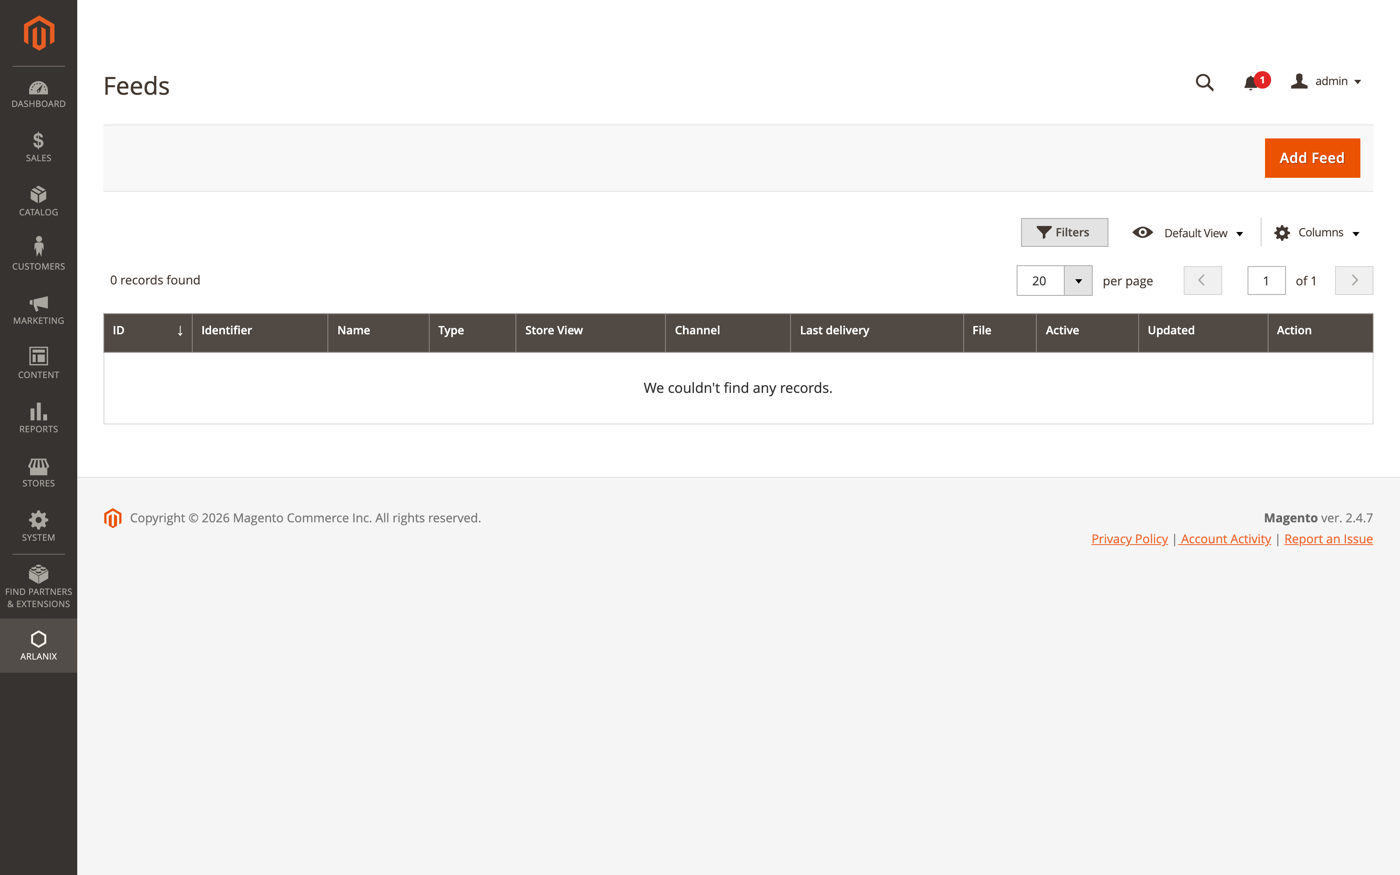
Press Add Feed. A form opens with six sections: General, Products, Mapping, Schedule, Google categories and Channel. The first two are open, the others are folded; click a section's title to unfold it. The steps below follow them from top to bottom.
Step 2. General: name the feed and say where it goes
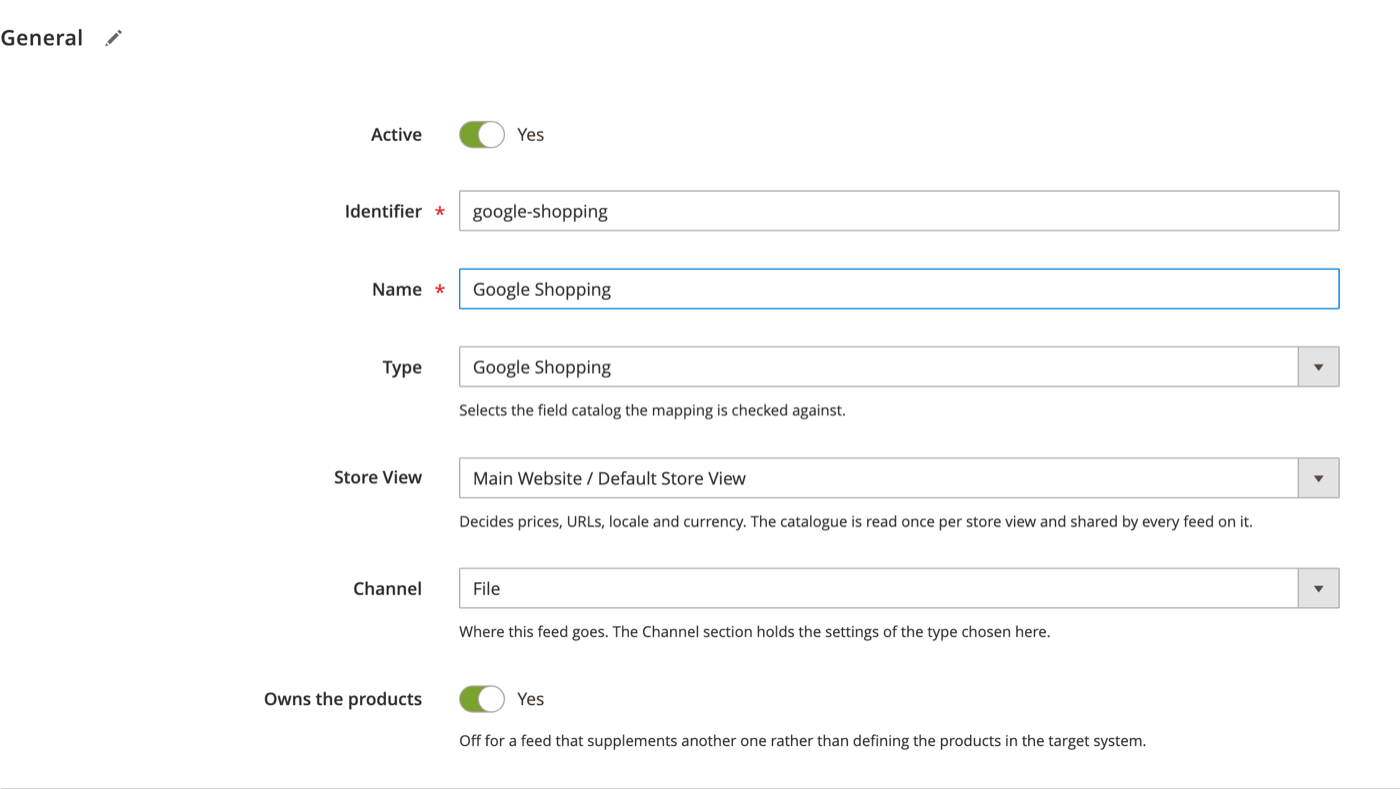
Fill it in like this:
| Field | Enter | Why |
|---|---|---|
| Active | Yes | An inactive feed is kept but never runs. |
| Identifier | google-shopping |
The feed's own code, used in the file's name. Lower-case letters, digits and dashes. Whatever you type is turned into that form on save. |
| Name | Google Shopping |
What the grid shows. |
| Type | Google Shopping | The platform's field catalog: what the mapping is copied from, and what the rows are compared with to warn you. Google Shopping knows Google's fields, which ones it requires and what they usually come from. Generic knows nothing and lets you name any field. |
| Store View | your store view | Decides the prices, the currency, the language and the product links in the feed. One feed is one store view: a shop in two languages makes two feeds. |
| Channel | File | Where the feed goes. File publishes it on your store, at an address you give Merchant Center once. It is the simplest choice and needs no Google account connected to Magento. The other channels are on the Merchant Center and SFTP pages. |
| Owns the products | Yes | On for a feed that defines the products in the target system, which is the normal case. Off only for a feed that adds a few fields to products another feed already sends. |
Step 3. Products: choose which products go in
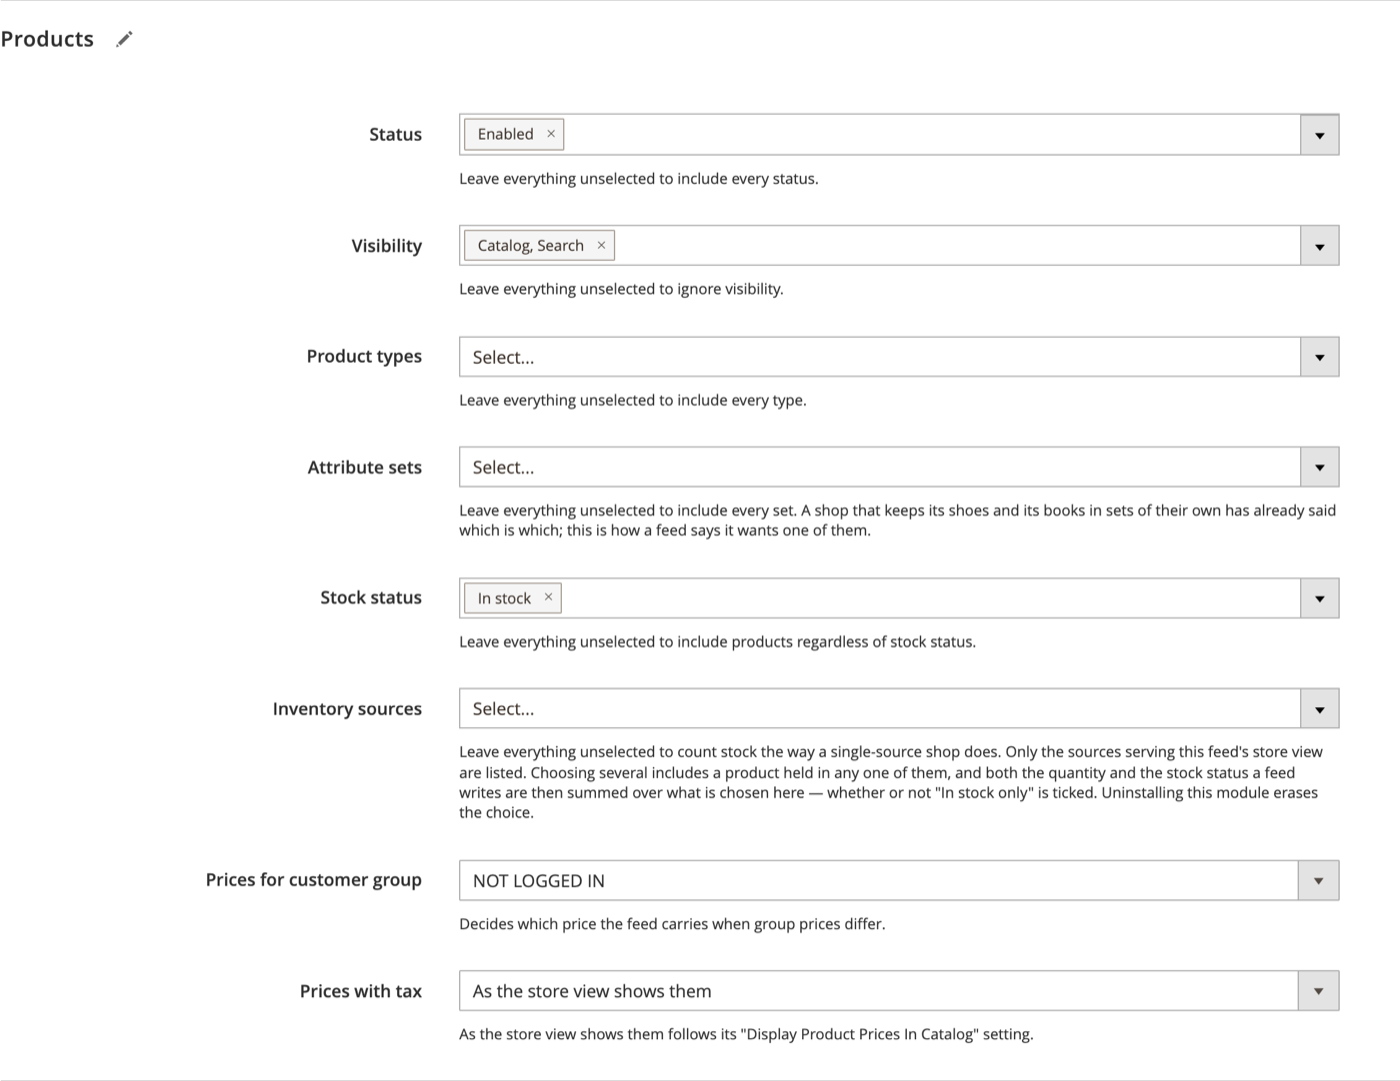
Every filter left empty means "everything". For a Google feed these three are the usual choice:
- Status: Enabled. Disabled products are not for sale.
- Visibility: Catalog, Search. This sends each product once, as the shopper finds it in your catalogue. A product sold in several sizes or colours goes out as one row.
- Stock status: In stock. Google disapproves products nobody can buy; leaving them out is simpler than sending them as out of stock.
If your sizes or colours have different prices, such as a tablecloth that costs more in 180 × 300 than in 140 × 180, Google wants each of them as a row of its own. The sizes and colours recipe changes this step for that; finish the feed first and come back to it.
Prices for customer group and Prices with tax decide which price the feed carries. Leave the defaults, NOT LOGGED IN and As the store view shows them: they give the price a visitor sees on your site, which is what Google compares against.
In the sample store these filters take 181 of its 2,040 products.
Step 4. Mapping: copy Google's fields
Unfold Mapping. The table is empty: no field is mapped yet.
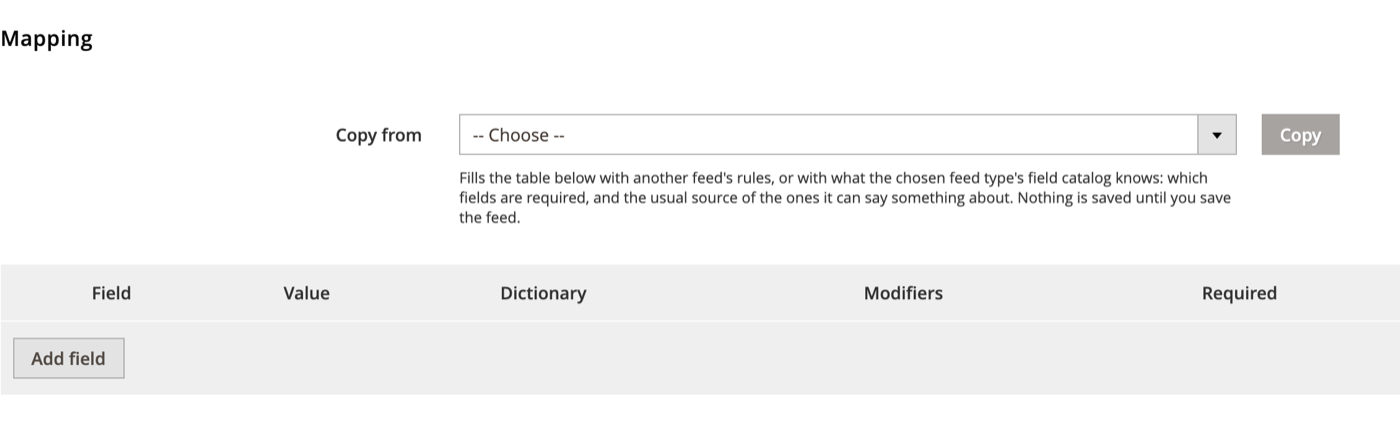
Instead of adding fields one by one, copy the whole catalog: in Copy from choose Google Shopping (under Field catalogs) and press Copy.
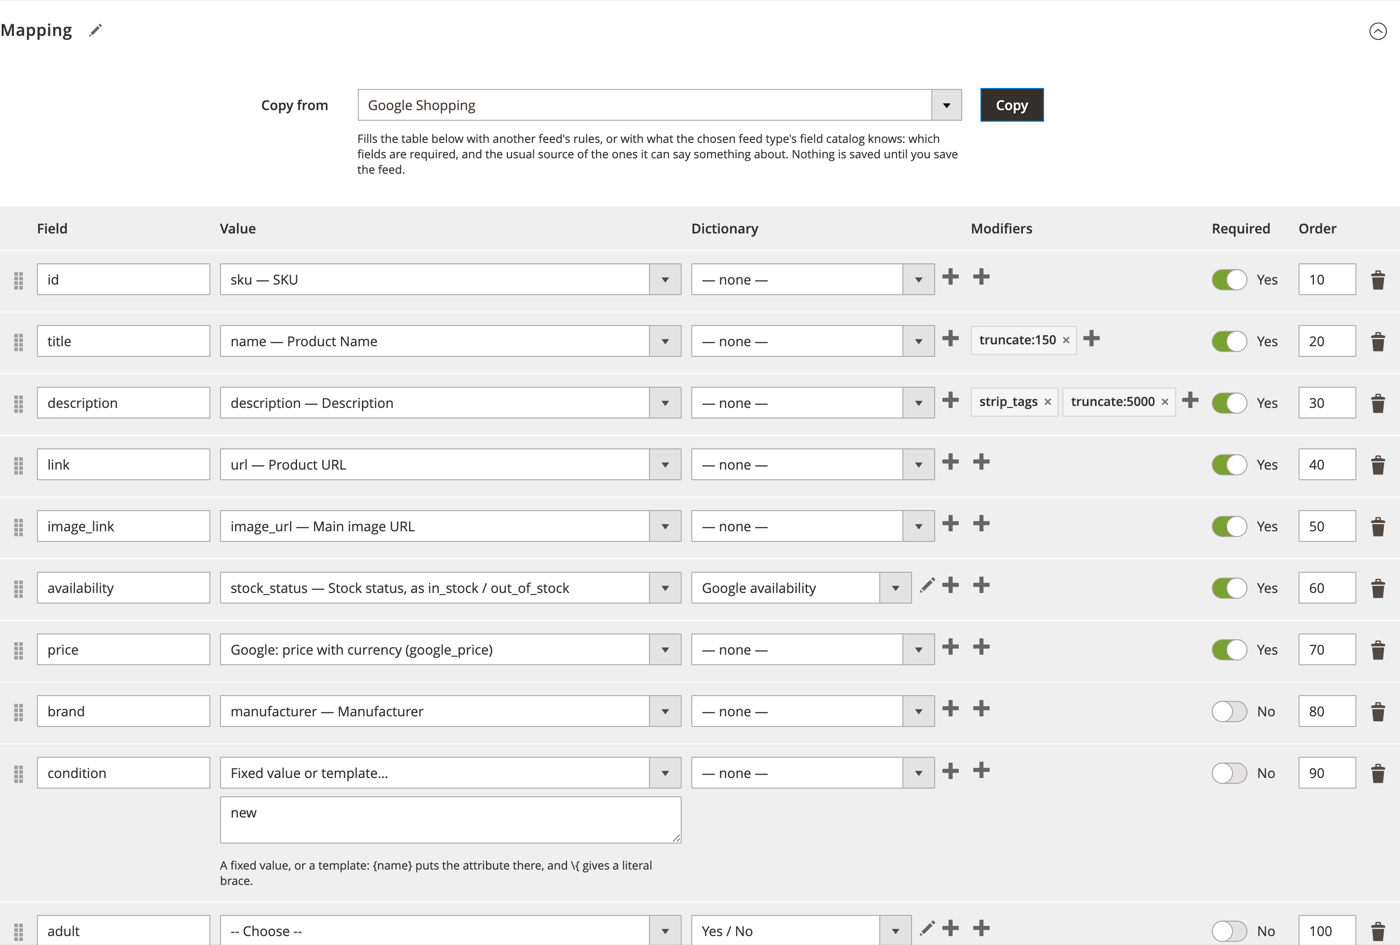
The table now has one row per Google field, with the source the catalog knows for it:
- the seven required fields, marked Required:
idfrom the SKU,titlefrom the name,descriptionfrom the description with HTML stripped,linkfrom the product URL,image_linkfrom the main image,availabilityfrom the stock status through the Google availability dictionary, andpriceas Google wants it, with the currency; - the optional fields Google can use:
brandfrom the manufacturer attribute,conditionas the fixed valuenew,item_group_idfrom the parent SKU, colour, size, material, pattern, sale price, Google category, and more.
Nothing here is saved until you save the feed. Leave the table as it is for now; the mapping page explains every column and how to change a source, add a modifier or use a dictionary.
Rows whose source says -- Choose -- (adult, age group, gender) carry nothing until you pick a source. That is fine: Google treats an empty optional field as not sent.
One row is worth a look now: brand reads the manufacturer attribute. If your store keeps the brand somewhere else, pick that attribute in the row's Value. If you sell your own products without a brand or barcodes, the own brand recipe shows the two rows to change.
Step 5. Schedule: when it runs
Unfold Schedule. Choose Every day, hour 03, minute 00.
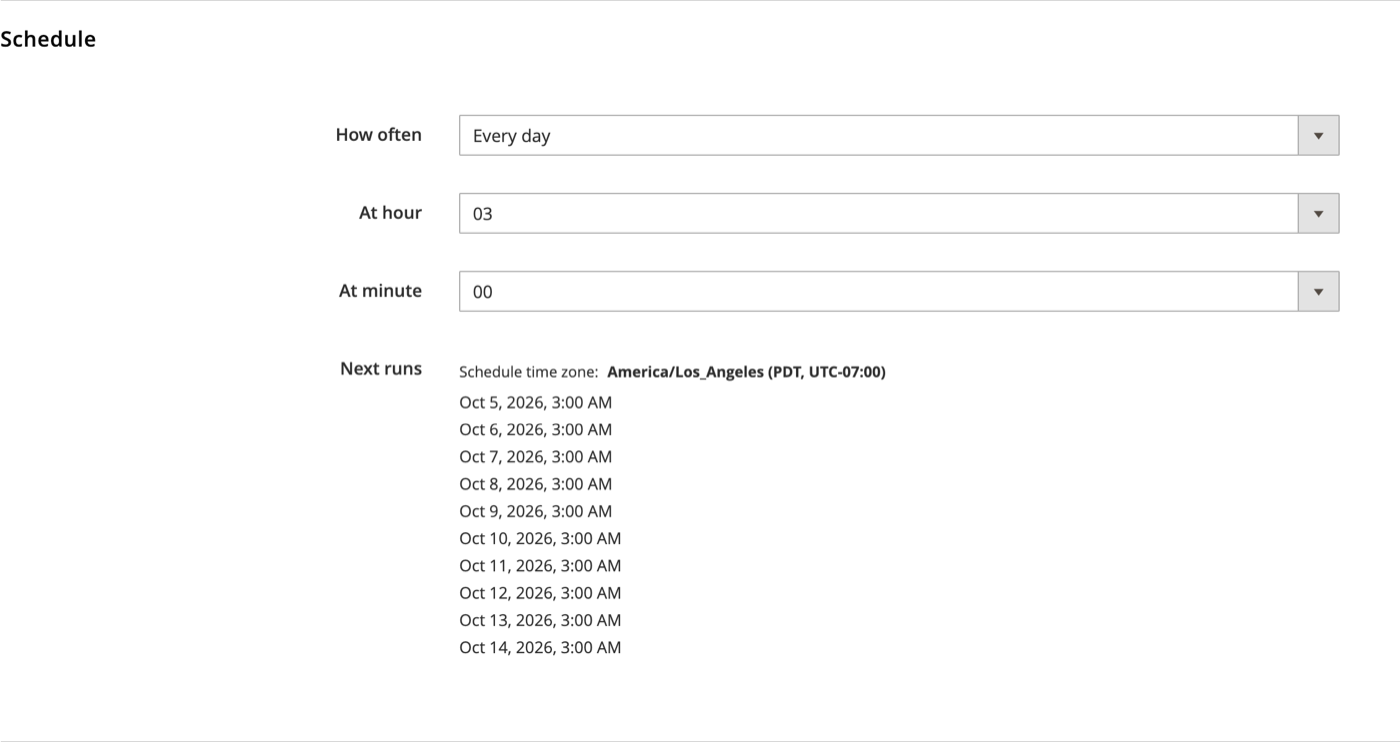
Next runs shows the next ten times, in the admin's time zone, so a mistake is visible at once. The other choices are every hour, every few hours, every week on a weekday, every month on a day, and Never for a feed you only run by hand.
A schedule needs the Magento cron, which your developer set up with the module.
Step 6. Google categories: say what you sell
Google sorts every product into its own list of categories, such as Home & Garden > Linens & Bedding > Table Linens > Tablecloths. The feed takes it from this section, so a product gets its category from the Magento category it is in.
Unfold Google categories.
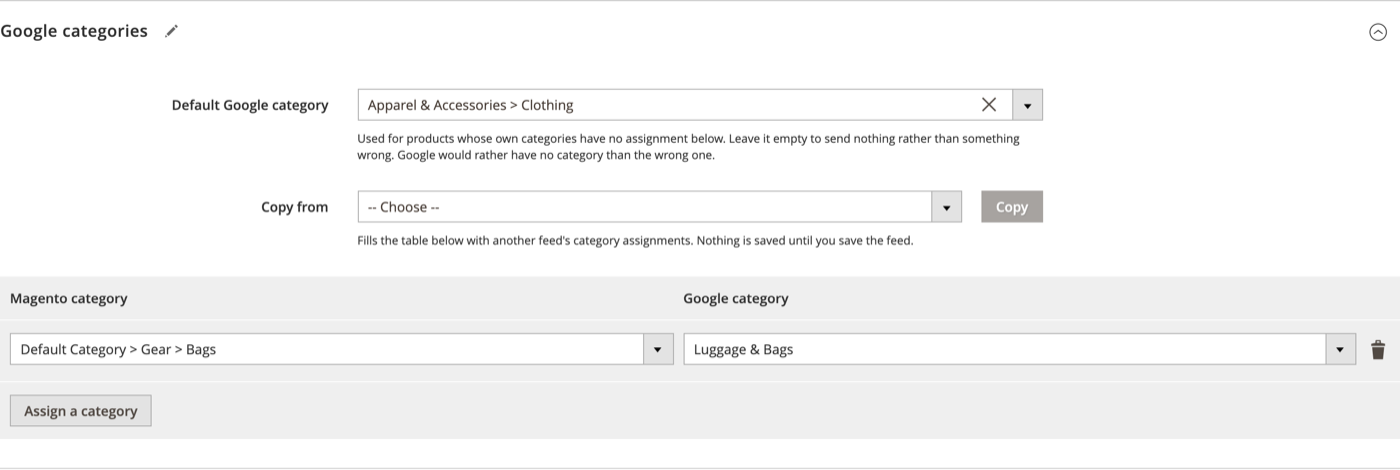
- Default Google category: the category for products whose own categories have none assigned below. Type a word, such as tablecloth, and pick the line from Google's list. In a shop that sells one kind of thing this one field is enough.
- Assign a category: one row per Magento category, with the same search. A product takes the assignment of its deepest category that has one, so assigning Table linen covers every category under it until a deeper one says otherwise.
Assign what you can now; the Google categories page explains the rest. A product with no category is still accepted, but placed less well.
Step 7. Channel: the file format and name
Unfold Channel.
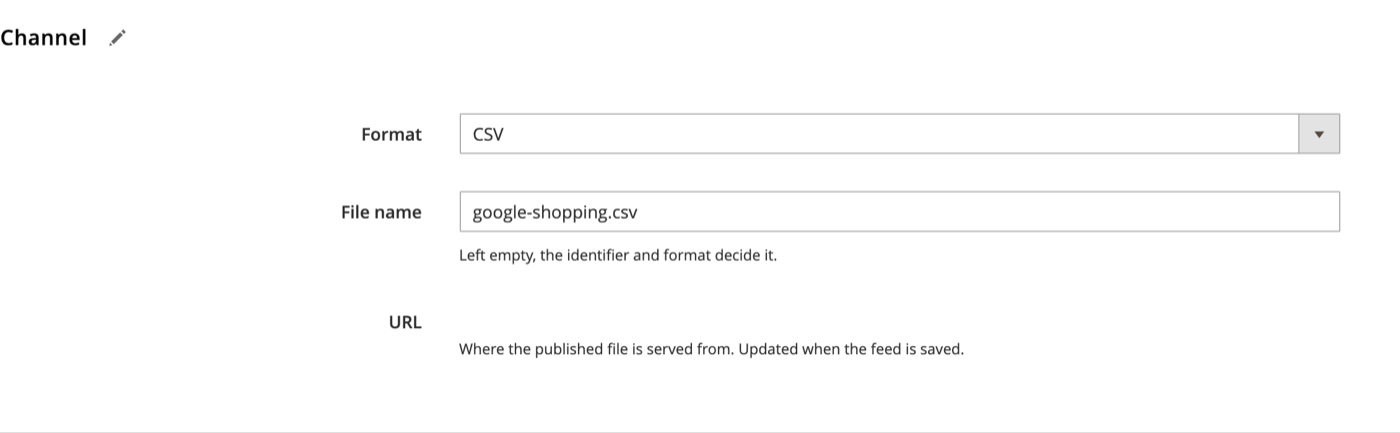
- Format: CSV. Google Merchant Center reads CSV, TSV and XML. The other two, JSON and JSON Lines (NDJSON), are for programs of your own; Merchant Center does not read them.
- File name:
google-shopping.csv. Left empty, the identifier and the format decide it, which gives the same name here. - URL is filled in by the module when the feed is saved: this is where the file will be served from. You will give this address to Merchant Center.
Step 8. Save
Press Save at the top right. The page reloads with a green message, and three new buttons appear next to Save: Run history, Preview and View products.
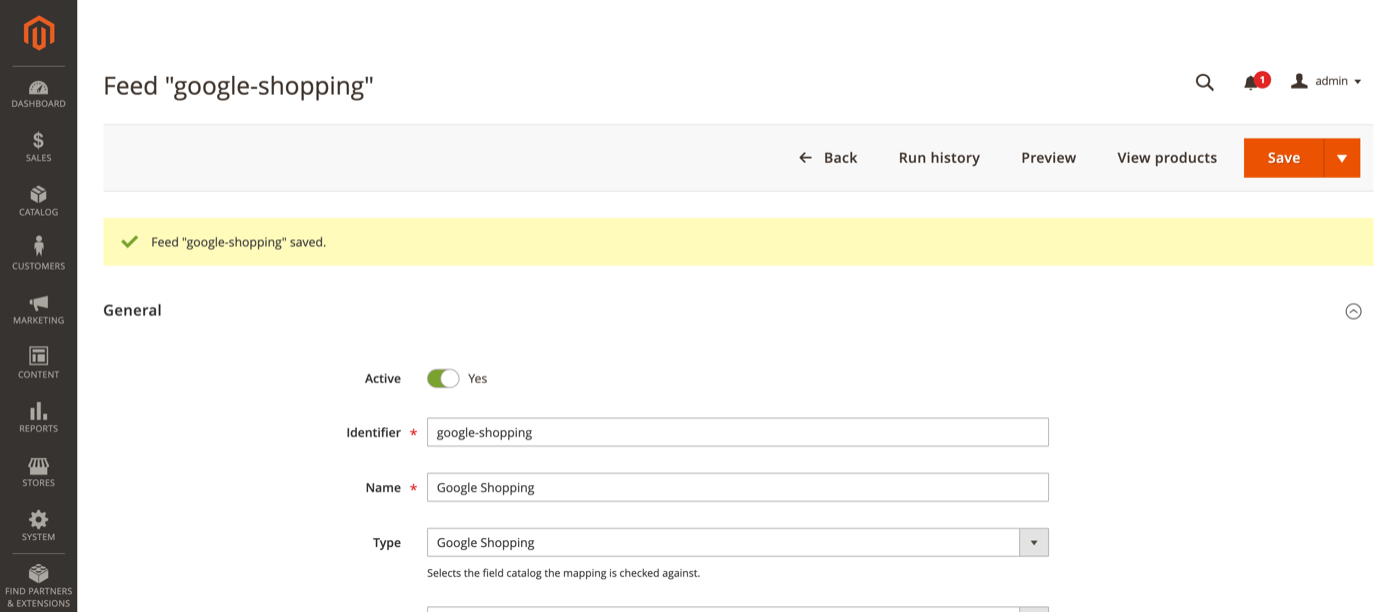
If the message is red instead, read it: it names the field that is wrong, and the form keeps what you typed. The usual causes are an identifier another feed already has and two mapping rows writing the same field.
Step 9. Run it once
The feed will run on its schedule, but you want to see it now. Go back to Arlanix → Feeds, open Select at the end of the row and press Generate now.
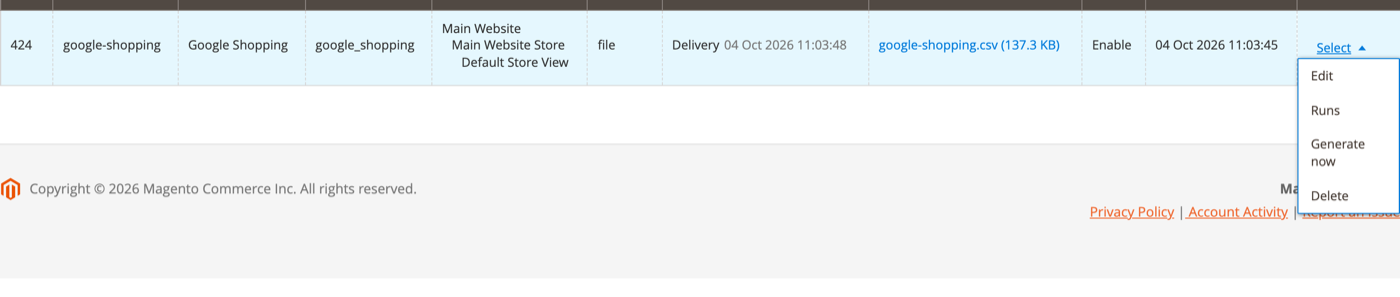
Confirm. This queues the feed for the next cron pass, so within a minute or two the row changes:
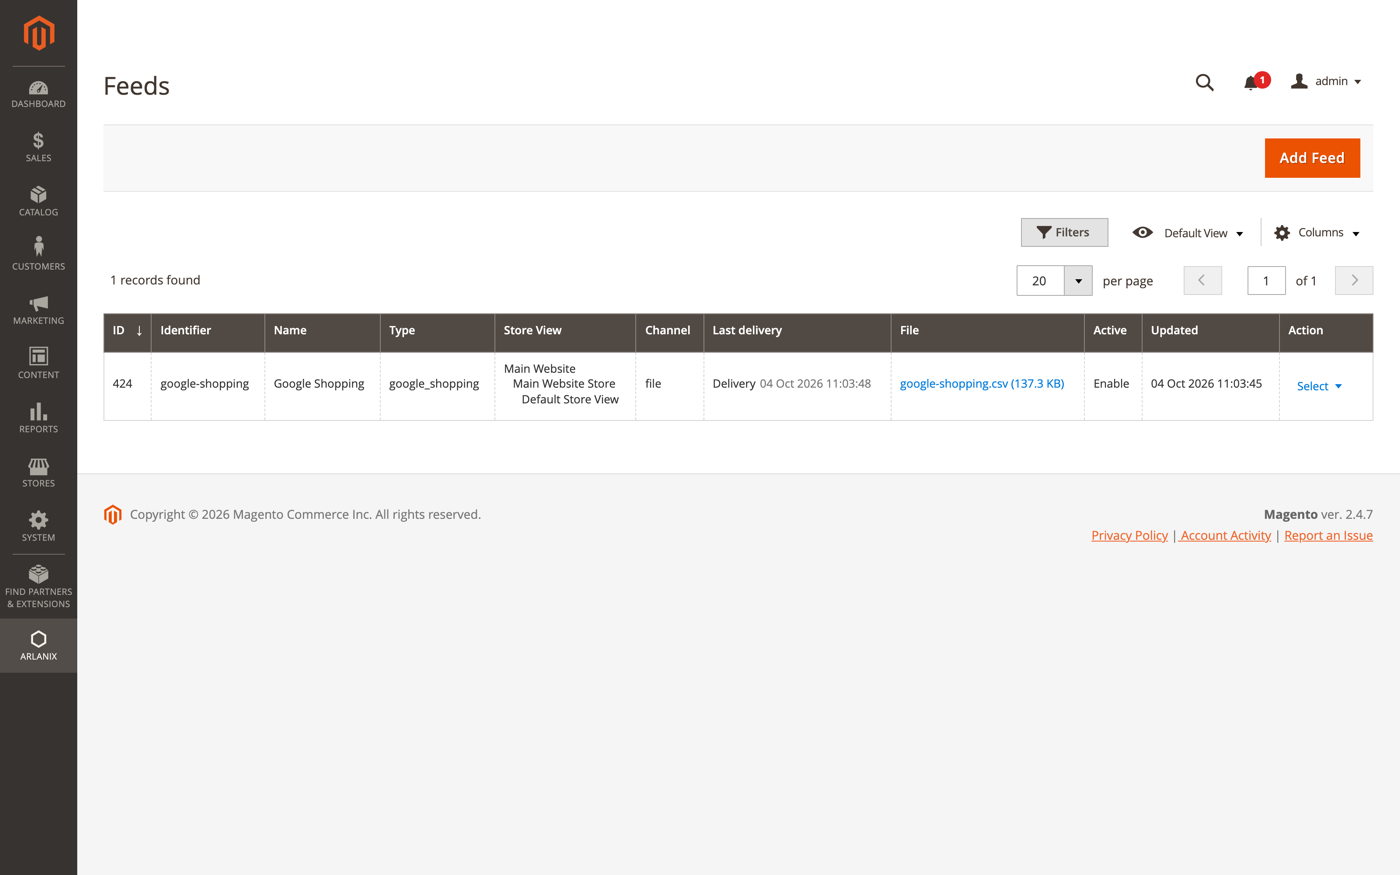
- Last delivery shows when the file was published.
- File is a link to the file, with its size. Click it to download the CSV.
If the row still says never delivered after five minutes, the Magento cron, which runs the feeds, is not running. That is for your developer: send them When feeds never run.
Step 10. Look at the result
The file is at the URL shown in the Channel section, https://your-store/media/arlanix/feeds/google-shopping.csv. The first lines look like this:
id,title,description,link,image_link,availability,price,brand,condition,…
24-MB01,Joust Duffle Bag,"The sporty Joust Duffle Bag can't be beat …",https://your-store/joust-duffle-bag.html,https://your-store/media/catalog/product/m/b/mb01-blue-0.jpg,in_stock,34.00 USD,,new,…
Run History lists what the run did, and Preview on the feed form shows any product's row without opening the file. Both are on the running and checking page.
Step 11. Give the file to Merchant Center
In Merchant Center go to Products → Data sources → Add product source → Add products from a file → Enter a link to your file, paste the URL and choose when Google should fetch it. Pick a time after the feed's own schedule, for example 04:00 for a feed that runs at 03:00, so Google always fetches a fresh file.
Done. From here on the feed runs every night, and Google picks it up every morning.
The first time, Google reviews every product, which takes up to a few days. Some may come back as disapproved or with warnings, usually for a missing barcode, a picture or the shipping settings of the account: When Google rejects products explains each and how to fix it.